Skip to content
 

Truncated Domes ADA Access Tile - 3' x 5' Mat - Surface Mount

$361.67


FREE SHIPPING
SKU ACC-S-3660-YW

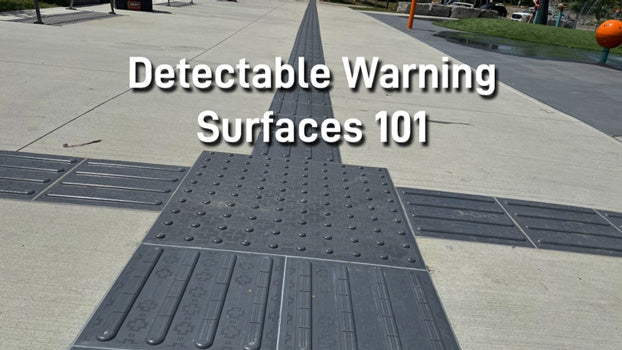
Truncated Dome mats are a commonly used underfoot detectable warning surface to alert visually impaired pedestrians of their proximity to potentially hazardous walking transitions. When using a White Cane the person has both an audible and tactile sense of the obstacles around. Variable surface ADA tiles are commonly placed in and near:

  • Sidewalk curb ramps
  • Crosswalks
  • Parking areas
  • Top of stair landings
  • Transit platform edge dropoffs
  • Wheelchair ramps
  • Escalator approaches

All of Access Tile Truncated Domes are certified ADA compliant.

The Surface Mount truncated dome mats can be installed at any time and do not need to be placed in wet-set concrete. These units are considered a "Retrofit" on existing pathways.  Installation requires drilling of anchors and application of Tactile Seal & Bond adhesive on the entire back along with an ~1/4" bead around edges of each tile.

*One Tube of Adhesive is included per tile, however, this is typically used up when bonding the tile to the ground substrate, and additional Tactile Bond & Seal are typically required for sealing of the tile perimeter.

RULE OF THUMB: ~1 additional tube consumed for every two 2'x4' size tiles.

For details on product availability and bulk pricing call us:

(800) 604-5337

Minimum Order = 5 Tiles

PRODUCT SPECS

  • Model: ACC-S-3660
  • Size: 3' X 5'
  • Free Shipping
  • Need a written quote?
        Request Online
  • Volume Pricing Available on Large Orders
  • Questions?
    Call (800) 604-5537

SURFACE MOUNTED  -  HIGHLIGHTS

  • Tile geometry allows for consistent dome spacing between adjoining tiles.
  • High density, diamond grip™ pyramid micro texture designed for exceptional slip resistance in wet and dry conditions.
  • Tamper-proof, countersunk, stainless-steel Axius® fastener set flush with truncated dome surface
  • Audible detectability technology engineered for sound amplification.
  • Textured surface to allow optimum adhesive bond.
  • Maximized strength load transfer design, bosses, located directly under domes transfer loads directly to substrate.
  • Adhesive location identified on the reverse side of tile for easy error-free installation.
  • Tiles are Slip resistant, corrosion resistant, and abrasion resistant

Full Installation Guide

Download

Technical Spec Sheet

Download

Submittal Package

Download

BRIGHT COLORS FOR MAX VISIBILITY

Yellow and other bright colors like orange and red reflect light making them easier for the eye to see even with severe visual impairment.  This is why most of the ADA products sold are typically bright colors such as:

Federal Yellow -YW.

The following color options are also available for the Surface Attached Tiles. Call us if you cannot find the color you're looking for.

Ochre Yellow - OCR
Brick Red - RD
Colonial Red - COL
Ocean Blue - BL
Bright White - WH
Light Gray - LG
Dark Gray - DG
Onyx Black - BK

INSTALLATION &
MAINTENANCE GUIDE

Full step by step installation and maintenance guides for our Cast In Place and Surface Mount Access Tiles can be found on our Installation and Maintenance Page.

Adhesion location identified on the reverse side of the tile for easy, error-free installation

Installation Instructions for Access Tile's ADA Compliant Tiles - FULL GUIDE HERE

SHIPPING

  • All items ship for free (standard ground, see map)
  • Call: (800) 604-5537 for pricing and shipping questions.

Shipping estimates shown on the map pertain to this specific product only. Orders typically om 3-4 business days if the order is placed before 12:00pm noon EST. Transit times displayed in the map are listed in business days, and are approximate. The day that the order is shipped is not counted as a transit day.

FREQUENTLY ASKED QUESTIONS

Questions about our Access Tile products?  Visit our FAQ section here.

Truncated Domes on a sidewalk near a mall courtyard

Surface Applied Truncated Domes in a mall courtyard

ADA Dome Surface Applied Installation In 6 Easy Steps

The following steps will help you install the Surface Applied ADA Domes. These tiles are also known as Inline Detectable/Tactile Warning Surface Tiles.

Surface Applied Truncated Domes are ideal for applications where the concrete is already in place and you are needing to add ADA Pads as a retrofit. The typical surface applied tile is installed using a combination of adhesive and/or fastener pins. The following installation guide is here to walk you through the steps of implementing this style of Surface Applied units. 

1. Review the Project Plans & Installation Location

While preparing the surface and installing the Surface Applied Detectable Tactile Warning Surface Tiles, make sure all procedures are met and adequate safety guidelines are in place. All these requirements are in accordance with the industry and government standards. You should coordinate with the contractor or engineer to guarantee that the surfaces being prepared and fabricated for the tiles are constructed correctly and are good for installation. Review the design drawings with the contractor before construction and refer all discrepancies to the engineer.

2. Mark Tile Placement with Marker

Set the tile true and square to the curb ramp area as shown in the design drawings so the location can be marked on the concrete surface. Tip, a thin permanent marker will work very well for marking. Remove the tile when you are done marking the location

3. Clean Surface for Installation

The surface where the Detectable Tactile Warning Surface Tile will be located must be mechanically cleaned with a diamond cup grinder or shot blaster to remove any dirt or foreign material. The cleaning and roughening of the concrete surface should include at least 4 inches around the perimeter of the area for the tile and along the cross pattern established by the corresponding area on the backside of the tile. Those areas must be cleaned with a clean rag soaked in Acetone.

Immediately before installing the Surface Applied Detectable Tactile Warning Surface Tile, the concrete surfaces must be inspected to guarantee they are clean, dry, free of voids, curing compounds, projections, loose material, dust, oil, grease, sealers, and are considered structurally sound and cured for a minimum of 30 days.

Use Acetone and wipe the backside of the tile around the perimeter and along the internal cross pattern to remove all dirt or dust particles from the area that will receive the adhesive.

4. Apply Adhesive to Tile

Apply Tactile Bond & Seal adhesive to the backside of the tile, following the perimeter and internal cross pattern set by the manufacturer. A sufficient amount of adhesive must be placed on the prescribed area to have full coverage across the 2-inch width of the adhesive locator and must be applied continuously within 1-4” around the perimeter edge of the tile. The entire tube of adhesive must be applied to the back of each tile that is 24” x 36” or greater.

Set the tile true and square to the curb ramp area as shown in the design drawings

Tactile Bond and Seal Adhesive placed on the back of Surface Applied Truncated Dome Panel Installation

Adhesive line indicated on back of surface applied truncated dome panel

5. Drill & Install Fasteners

Working from the center outward, drill and install all fasteners in the tile's molded recesses.

Standing with both feet applying pressure around the molded recess in the tile, drill a hole true and straight to a depth of 3-1/2” using a 1/4” drill bit. Drill through the tile with the hammer until the tile has successfully penetrated. Using the option of the hammer, drill into the concrete. Maintaining foot pressure on both sides of the hole while drilling prevents concrete dust from building up between the tile and concrete which can affect the tile being installed flush and could compromise installation integrity.

Before moving on to the next tile, immediately after drilling each hole, and while applying foot pressure, mechanically fasten the tiles to the concrete substrate using a leather-bound or hard plastic mallet to set the fasteners. Make sure the fastener has been placed to full depth in the dome, straight and flush to the top of the dome. Drive the pin of the fastener with the mallet making sure to avoid any inadvertent blows to the truncated dome or tile surface.

Truncated Dome Adhesive

Tactile Bond and Seal Adhesive for Truncated Domes

6. Clean & Seal Tiles

After the installation of the fasteners, the concrete dust must be vacuumed, blown away, and brushed from the tile's surface and the adjacent concrete. Using Acetone on a rag, wipe the concrete around the tile's perimeter to make sure it's clean and has a dry surface to place the perimeter sealant.

Following the sealant recommendations of the manufacturer, Tactile Bond & Seal perimeter caulking sealant should be applied. Tape the border edges of the tile back from the tile border edges and tape the adjacent concrete back 1/2” from the tiles' perimeter edge. Apply the sealant around the edges using caution to work the sealant into any voids between the tile and concrete interface. Apply the perimeter caulking with a plastic applicator or spatula to create a straight edge between the tile and bordering concrete. Remove the tape immediately after the perimeter caulking sealant.

7. No Traffic Until Cured

Do Not allow foot traffic on the installed tiles until the perimeter caulking sealant has cured sufficiently to avoid tracking. Any adhesive on the surface of the Armor-Tile can be removed with Acetone.

Bonus Material - Installation Tips

Installing Adjacent Truncated Dome Tiles

If you are installing adjacent tiles, pay attention to the orientation of each tile. Paying careful attention will show that one of the long edges of the tile is different from the other in regard to the tiny dotted texture. You may also see a larger perimeter margin between the tiny dotted texture pattern begins. Consistent orientation of each Armor-Tile is required in order that the truncated domes on the adjacent tiles line up with each other.

In order to ensure proper spacing between truncated domes on adjacent tiles, the tapered edge should be trimmed off using a continuous rim diamond blade in a circular saw or mini grinder. The use of a straightedge to guide the cut is also required. All cuts should be made before the installation of the tiles. If installing adjacent tiles, take care to leave a 1-8” gap between each tile to allow for expansion and contraction.

Custom Fit Cut Tiles

If tiles will be custom cut to size, if pre-molded recesses to receive fasteners are removed by the cut, or to maintain a tight installation to the substrate, then any truncated dome can be centered-drilled with a 1/4” through the hole and countersunk with a suitable bit to receive mechanical fasteners. Care should be shown to not countersink too widely or deeply. Fasteners should be flush with the top of the truncated dome when countersunk correctly.

What Are Truncated Domes and Where Are They Required?

Approximately 12 million people aged 40 and above in the US have impaired vision, including 1 million who are blind, 3 million who have visual acuity after correction, and another 8 million who have poor vision due to uncorrected refractive error? According to the CDC, vision loss causes a substantial toll on the lives of millions of Americans. To make these individuals' lives better, different laws require installing truncated domes in public spaces.

Yellow Truncated Domes helping blind and visually impaired near crosswalk

Visually impaired utilize Truncated Domes to detect were crosswalks and roads are located

Truncated domes are designed to make public spaces accessible and safer for the blind. These mats alert them of hurdles on their paths through tactile feedback. They must be installed on curb cuts, street intersections, transit platform edges, track crossings, islands, or cut-through medians.

The rest of this article will describe the origin of truncated domes, why they are necessary, and the legal standards to follow when installing them. Read on for these and a detailed review of the favorite truncated domes on the market.

What Are Truncated Domes?

If you've ever stepped on tactile paving, then you have an idea of what truncated domes are. As the name suggests, they are pavers made to be seen, felt, and heard, providing a detectable warning to pedestrians, especially the visually impaired.

These detectable warning systems are designed to make public spaces more accessible and safer. Often, they come with wayfinding bars that safely guide all pedestrians. Therefore, these pavers enhance the safety of everyone in your community, regardless of their abilities. Typically, truncated domes are either square or rectangular and have bumps on the surface. These bumps can often be circular, signifying 'stop' or rectangular, indicating 'go.'

Different countries have unique requirements and standards. These standards determine the color, size, shape, and distribution of the bumps. Truncated domes are mostly made of heavy-duty polyurethane, ceramic, or concrete. This is because these substances are durable.

Although they're popular for their safety, these pavings are sometimes controversial since the bumps can sometimes pose challenges to those in wheelchairs and are sometimes slippery. However, as this article by Perkins School for the Blind highlights, there have been efforts to make truncated domes safe for use by everyone.

Why Use Truncated Domes?

Why would the law be so specific on truncated domes? What makes them so special?Well, two main reasons make these modern versions of Tenji blocks worth insisting on:

1. Truncated domes have a unique, discernible underfoot that does not require visual input to sense. 

2. The standardized use of tactile pavers means consistency in warnings and the same safety levels, regardless of the state or city one visits.

Just to emphasize the second point, Imagine what would happen if these installations were not standardized. That would be burdensome to the visually impaired, right?

In a nutshell, truncated domes can reflect sound, assisting those who use guidance canes to navigate public spaces without assistance safely.

ADA Pads assist the visually impaired

The ADA Americans with Disabilities Act required Truncated Domes to assist the visually impaired

Americans With Disabilities Act (ADA) & Truncated Domes

The Americans with Disabilities Act is one of the laws that recognize the rights of individuals with disabilities. Formulated in 1990, this Act prohibits discrimination of disabled persons. It applies to employment, movement, and accessibility to public spaces. As mentioned earlier, different laws exist that require you to install tactile pavers in specific areas. These laws include ADA, the Public Right of Way Act, and California Title 24 requirements.

ADA requires that all public spaces be accessible and that community members find it convenient and enjoyable when in such spaces. Most notably, the Act requires you to use truncated domes as visual and tactile warning systems for those with visual impairments. To strengthen the ACT, the government introduced ADA standards. A section of the standards specifies that truncated domes must be installed in spaces accessible by the public.

These spaces include but are not limited to parking garages, escalators, stairs, transit platforms, wheelchair ramps, and pedestrian crossings.

Besides, there exist ADA Accessibility Guidelines, which specify the requirements for truncated dome installation. Some of the specifications include:

  • General: This section specifies that detectable warnings must comprise truncated domes aligned in square or radial grid patterns.
  • Dome Size: Truncated domes must have a base diameter ranging between 23 mm (0.9 in) and 36 mm (1.4 in) maximum. The top diameter must be 50%-60% of the base diameter, and the height must be 5 mm (0.2 in).
  • Dome Spacing: The center-to-center spacing of the truncated must be a minimum of 41 mm (1.6 in) and a maximum of 61 mm (2.4 in). The base-to-base spacing must be at least 17 mm (0.65 in).
  • Contrast: The surface of a truncated dome must visually contrast the adjacent walkway surface, highway or street, or gutter. I'll discuss this requirement in detail in a subsequent subheading.
  • Size: A tactile paver's surface must extend by at least 610 mm (24 in). It should be in the direction of travel.
  • Location: Suppose a perpendicular curb ramp's bottom grade break's ends are at most 1.5 m (5.0 ft) or less from the curb's back. In that case, you should install the truncated dome on the ramp surface at the grade break's bottom. Otherwise, it should be installed on the lower landing. For landings and blended transitions, the truncated dome should be installed on the blended transition at the curb's back or landing.
  • Alignment: The guidelines require that you align the rows of truncated domes either perpendicularly or radially to the grade break between the blended transition and the street, ramp, or landing.
Surface Mount Truncate Domes at curb crosswalk

Surface Mount Truncated Domes near crosswalk 

Surface-Mount Tiles

There are two kinds of Truncated Domes. The Cast in Place style that is installed in wet concrete and also the Surface Applied style that is Installed over existing surfaces as a retrofit. Installing a surface-mount tile? This is relatively easier – you won't be pouring any fresh cement.

Follow these steps to install a surface-mount tactile paver:

  • Ensure the surface is free of moisture, debris, oil, and grease.
  • Apply an adhesive to the tile's underside.
  • Set the tile on the installation area
  • Once the tile is in the correct location, drill holes into the cement at the pre-formed fastener locations.
  • Apply adhesive around the edge of the tile as necessary

Where Are Truncated Domes Required?

Now that we've discussed the relevant guidelines to follow when installing truncated domes, let's discuss the location specification in more detail. Here are some of the places that require tactile surfaces:

Besides, there exist ADA Accessibility Guidelines, which specify the requirements for truncated dome installation. Some of the specifications include:

Curb Ramps

Curb Cuts allow scooters, walkers, and wheelchair users to travel between sidewalks and streets safely. However, visually impaired persons may find it difficult to identify these transitions.

Therefore, truncated domes are required at the transitions between streets and sidewalks, where curbs indicate crosswalks or anywhere with a cut. For instance, truncated domes on sidewalks tell blind or partially blind individuals that they are moving traffic nearby or are in a safe area.

Street Intersections

Curb cuts at street intersections must have tactile pavers. Local authorities usually install curb cuts at pedestrian crossings, easing access to building entrances and easing the transition to and from parking garages. Besides, they may install curb ramps and truncated domes at nearby crossings, depending on public facilities' availability or if people with mobility disabilities suggest they are needed.

Transit Platform Edges

Did you know that the ADA requires all unguarded platform boarding edges to have tactile pavers?

The standards require panels that are at least 24 in (60.96 cm) wide on the platforms used by the public. Although grooved lines are the most common warning systems on transit platform's edges, these lines are not as safe as truncated domes. Notably, people with poor vision may not easily recognize grooved lines.

On the contrary, truncated domes are easy to identify, even underfoot, through your shoes' soles. Therefore, these tactile pavers are better at alerting people to prevent them from falling onto train tracks.

Truncated Domes on Transit Platform in Japan

Track Crossings

Tactile pavers are required on sidewalks leading to track crossings. As a general principle, the pavers must be far enough to alert people well in advance before their lives could be at risk. A distance of 6-15 ft (1.83-4.57 m) from the nearest rail's centerline is mostly considered sufficient. 

The distance leaves enough room for train gates to close, keeping individuals far enough from passing trains.

Islands or Cut-Through Medians

As a general rule, any raised islands at crossings must be level with the street. Besides, they must be cut through. Alternatively, they can have curb cuts on both sides.

The direction of the curb cut's running slope must have a level of length 48 in (121.92 cm) and width 36 in (91.44 cm) at the minimum.

Caution: It's not advisable to install truncated domes on steep slopes.

Meanings of Patterns on Tactile Paving

Now that we've discussed the areas where truncated domes are required, let me pose a question:

Have you ever noticed how tactile pavers' patterns often change, depending on the location?

If you've been keen enough, you may discover that these patterns depend on the hazards that are present in the specific locations. That is because different truncated domes' patterns indicate various dangers. Here are some of the patterns and their meanings:

Tactile Paving Patterns Lozenge shape, Offset Blister and Parallel Blister Truncated Domes

Truncated Dome Styles

Tactile Paving Blister, Offset Blister, & Lozenge Designs

Parallel blister lines: Truncated domes that have flat-topped blisters in square patterns indicate a road crossing ahead.

Offset blisters: These signify a train platform edge ahead; thus, you should be careful not to fall into the ditch. They also indicate a level change.

Lozenge-shaped patterns: They warn the visually impaired that they're approaching an on-street transit line's edge, such as a tram line.

What Does Visual Contrast Mean?

In the previous section on the ADA guidelines to follow when installing truncated domes, we mentioned that there must be a contrast between the tactile paver's color and that of the adjacent area. Let me describe in detail why this requirement is critical.

First, the aim of installing truncated domes is to provide a clear warning of the hazards in the path ahead. Although they are designed to warn pedestrians without providing visual information, pedestrians with visual acuity may encounter challenges distinguishing between the tactile pavings' colors and the surroundings. Because of that, they may fail to spot the warning tiles well in advance, exposing them to danger.

ADA regulations require a dark-on-light or a light-on-dark contrast. This means truncated domes must have a coloring opposite that of the surrounding. Besides, the entire field housing the domes, rather than just the domes, must be of a single color for better visual contrast.

Further Reading on Truncated Domes

How Do Detectable Warning Surfaces Work?

Sep 01, 2021 Ryan Matheson

Detectable warning surfaces help people with visual impairment to know where pedestrian transitions are. They are required by the ADA Americans with Disabilities Act and are placed near intersections and on transit platforms to alert passersby. These ground mats have noticeable contrasting colors and raised domes for multi-sensory feedback.

TRYING TO MEET A SPEC? 

We Can Help

QUESTIONS?

Call (800) 604-5537
or Email
Monday - Friday 8AM - 5PM PST

SHIPPING NATIONWIDE

*Contiguous 48 States Only